
RecyclerView的Bug复现及源码分析
- 引言:在上一篇网络加载图片的博客中,遇到了一个比较奇怪的问题,特在此进行总结。
1.场景复现
1.问题描述:
我们在使用RecyclerView加载子布局文件后,发现无论子视图的布局文件宽高设置为wrap_content还是match_parent,均以wrap_content进行显示,十分奇怪。
2.相关代码
1.主视图布局文件main.xml
1 | <?xml version="1.0" encoding="utf-8"?> |
2.子项布局文件list_item.xml
1 | <LinearLayout xmlns:android="http://schemas.android.com/apk/res/android" |
3.Adapter相关代码
1 |
|
主Activity相关代码就不贴了,因为问题重点不在那里。那按照这种布局来说,我们应当是以每张图片都占据一个屏幕的大小来list出10张图。然而真实情况是这样吗?上图:
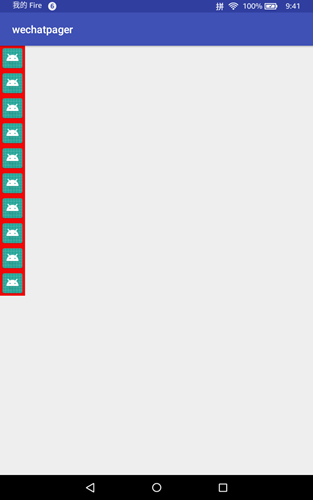
可以看到,很奇怪,居然与我们想象的大相径庭,到底是什么原因引起的呢?让我们一步步来分析。
2.原因分析
现在的问题是,子项布局的属性失效了,那自然是与子项视图的加载相关,哪里涉及到了子项布局的加载工作呢?那自然是Adapter中的onCreateViewHolder()方法了,我们看看当时怎么写的:1
2
3
4
5
6
public RecyclerView.ViewHolder onCreateViewHolder(ViewGroup parent, int viewType) {
//这里进行了子视图的加载工作
View view = LayoutInflater.from(mContext).inflate(R.layout.list_item,null);
return new MyHolder(view);
}
可以看到,我们通过LayoutInflater布局加载器去加载子项视图,跟进去看源码怎么实现的。1
2
3public View inflate(@LayoutRes int resource, @Nullable ViewGroup root) {
return inflate(resource, root, root != null);
}
原来无论我们给不给定第三个参数的值,都会去调用三参的方法,在只有两个参数的情况下,第三个参数的值由是否传入parent来决定。继续:1
2
3
4
5
6
7
8
9
10
11
12
13
14public View inflate(@LayoutRes int resource, @Nullable ViewGroup root, boolean attachToRoot) {
final Resources res = getContext().getResources();
if (DEBUG) {
Log.d(TAG, "INFLATING from resource: \"" + res.getResourceName(resource) + "\" ("
+ Integer.toHexString(resource) + ")");
}
final XmlResourceParser parser = res.getLayout(resource);
try {
return inflate(parser, root, attachToRoot);
} finally {
parser.close();
}
}
这里将我们的资源文件Id通过xml解析器转换为了布局文件并进一步去调用,接着往下看:1
2
3
4
5
6
7
8
9
10
11
12
13
14
15
16
17
18
19
20
21
22
23
24
25
26
27
28
29
30
31
32
33
34
35
36
37
38
39
40
41
42
43public View inflate(XmlPullParser parser, @Nullable ViewGroup root, boolean attachToRoot) {
//省略无关代码
final AttributeSet attrs = Xml.asAttributeSet(parser);
View result = root;
// Temp is the root view that was found in the xml
final View temp = createViewFromTag(root, name, inflaterContext, attrs);
ViewGroup.LayoutParams params = null;
//第一种情况
if (root != null) {
if (DEBUG) {
System.out.println("Creating params from root: " +
root);
}
// Create layout params that match root, if supplied
params = root.generateLayoutParams(attrs);
if (!attachToRoot) {
// Set the layout params for temp if we are not
// attaching. (If we are, we use addView, below)
temp.setLayoutParams(params);
}
}
// Inflate all children under temp against its context.
rInflateChildren(parser, temp, attrs, true);
//第二种情况
// We are supposed to attach all the views we found (int temp)
// to root. Do that now.
if (root != null && attachToRoot) {
root.addView(temp, params);
}
//第三种情况 (我们采用的那种)
// Decide whether to return the root that was passed in or the
// top view found in xml.
if (root == null || !attachToRoot) {
result = temp;
}
//省略部分代码
return result;
}
从上面的代码我们可以看出,通过createViewFromTag创建了我们的根布局temp,然后如果root不为空,分了两种情况,一是我们同意attach到根布局(对应情况二),那么我们会将所有子视图连同参数都attach到根布局;二是我们不想attach的话(对应情况一),仅仅只会为我们的根布局设置对应参数。而当我们root==null时,只是返回了创建的temp而并未携带任何参数。好了分析到这里,我们来看看RecyclerView是如何将Item子视图加载进来的。
我们为RecyclerView设置了LinearLayoutManager去管理相关布局,我们找到LinearLayoutManager中布局相关加载的方法:1
2
3
4
5
6
7
8 View next(RecyclerView.Recycler recycler) {
if (mScrapList != null) {
return nextViewFromScrapList();
}
final View view = recycler.getViewForPosition(mCurrentPosition);
mCurrentPosition += mItemDirection;
return view;
}
可以看到视图加载是进入到了getViewForPosition方法中,跟进去看看:1
2
3
4
5
6
7
8
9
10
11
12
13
14
15
16
17
18
19
20
ViewHolder tryGetViewHolderForPositionByDeadline(int position, boolean dryRun, long deadlineNs) {
//省略前段代码
final ViewGroup.LayoutParams lp = holder.itemView.getLayoutParams();
final LayoutParams rvLayoutParams;
if (lp == null) {
//注意这个方法
rvLayoutParams = (LayoutParams) generateDefaultLayoutParams();
holder.itemView.setLayoutParams(rvLayoutParams);
} else if (!checkLayoutParams(lp)) {
rvLayoutParams = (LayoutParams) generateLayoutParams(lp);
holder.itemView.setLayoutParams(rvLayoutParams);
} else {
rvLayoutParams = (LayoutParams) lp;
}
rvLayoutParams.mViewHolder = holder;
rvLayoutParams.mPendingInvalidate = fromScrapOrHiddenOrCache && bound;
return holder;
}
从上面的代码我们可以看到,在加载子项视图的时候,我们去判断了View的参数是否是空的,而通过上面的分析,由于parent为null,我们的视图并未携带任何参数,因此在这里会给我们一个generateDefaultLayoutParams()的参数,我们进去看看这个参数:1
public abstract LayoutParams generateDefaultLayoutParams();
发现它是一个接口,那我们就去找它的子类LinearLayoutManager中的实现:1
2
3
4
5
public LayoutParams generateDefaultLayoutParams() {
return new LayoutParams(ViewGroup.LayoutParams.WRAP_CONTENT,
ViewGroup.LayoutParams.WRAP_CONTENT);
}
看到这里,我们终于揪出了问题产生的原因。原来当我们在inflate()方法中去传入parent为null时,系统会默认为我们添加一个包裹内容的父组件,导致我们的视图填充属性失效。要解决这个问题,我们看了源码可知,只需要传入一个非null的父组件就行,那代码就可以这样写:1
2
3
4
5
6
public RecyclerView.ViewHolder onCreateViewHolder(ViewGroup parent, int viewType) {
//在这里我们传入参数中的parent但是仅仅获取参数
View view = LayoutInflater.from(mContext).inflate(R.layout.list_item,parent,false);
return new MyHolder(view);
}
让我们来看看现在的的效果怎么样:
可以看到,子布局的参数已经生效了,问题解决。最后,可能有人会觉得,我想将它添加到父布局中去,所以将第三个参数设置为了
true,结果发现报错了。如下所示: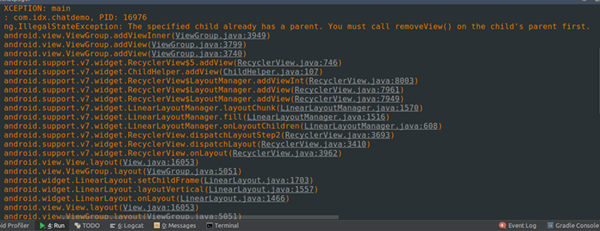
这是为什么呢?因为我们addView()操作做了两次,这是不允许的,每次只能去加载一个View。那这不是自相矛盾吗?第三个参数的意义在哪里?
其实,第三个参数是为了我们的自定义布局准备的,我们可以在自定义布局中将我们的item子项通过这种方式直接添加进去,进而完成视图的加载工作,省时省力。
好了,本篇解析到此结束,接下来可能会对以前的一些重要知识点进行一个梳理工作。 ————学如逆水行舟,不进则退,技术更是如此。